
Godot CI
As I've progressed with development of Clean Escape I started to get tired of exporting all my builds and uploading them every time I wanted my buddies to test things out. It was also tough to make sure I remembered all the places to upload things and that I was consistent with my naming and zipping up of files. Plus I'm just super lazy and wanted to click less buttons.
If you're having these issues as well, no worries! They're so common that there is a whole thriving CI/Build server industry and being a Release Engineer is a noble career. Also, while the things I'll show here probably aren't as robust and auditable as a big company would like, they are effectively free, and perfect for small scale indie developers!
In this post I will walk you through the basics of exporting a Godot project, automating that export process, and uploading those automatic builds as new releases.
- First, we'll export our project. ->
- Then we will link our project with CircleCI. ->
- Next is scripting the export process. ->
- And finally, we automate itch.io releases. ->
Setting Up Exports
First things first, you need to setup some export presets in your Godot project. I've taken these screenshots in Godot 3.1 but 3.0 and even Godot 2 don't differ much here.
Installing Export Templates
If you don't have the prebuilt export templates you can get them here, there are links at the bottom for older versions if you need them.
Once you've downloaded the appropriate templates and opened up your
project, you should be able to navigate to
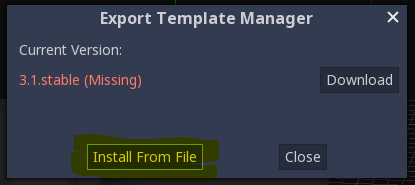
Editor -> Manage Export Templates

That should take you to a dialog like this, in older versions it
may look different and not have the Download button.
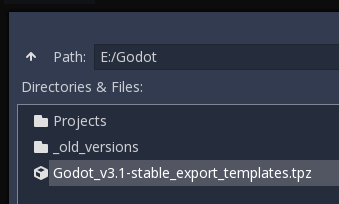
But there should be an Install From File button or
similar, click that guy and then navigate to wherever you downloaded
those export templates, select the file, and hit open!
Bam, you've now got the export templates installed and this should let you export just about any Godot project for Android, iOS, macOS, Linux, Windows, HTML5, etc. Barring any control-scheme problems of course!
Configuring Export Presets
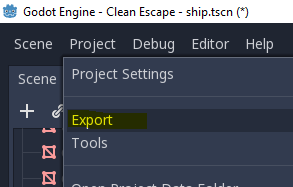
Now you should be able to navigate to Project -> Export
and see a dialog like this, though possibly without anything in the
left hand panel.
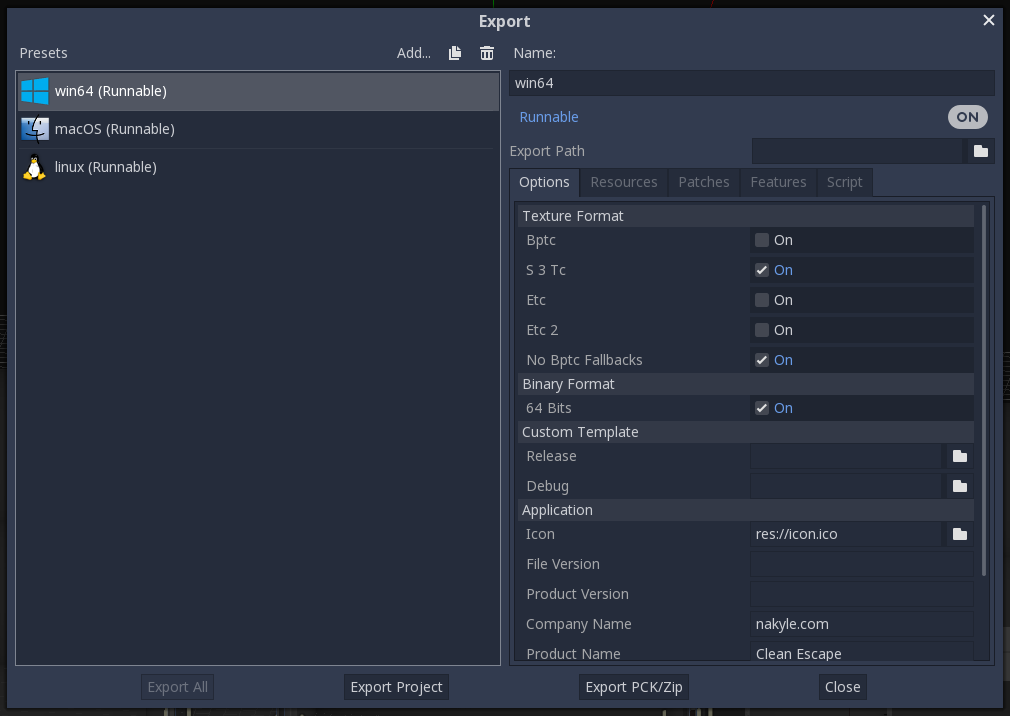
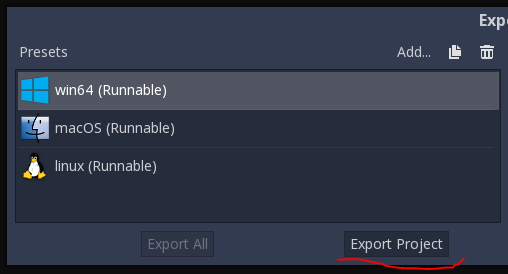
I already have export presets setup for Windows, macOS, and Linux.
There are quite a few options for how to export your projects and
how they work on different platforms, but I'll leave figuring that
out up to you! For now, if you don't have any presets, just click
the Add... button up at the top and choose
Windows Desktop.

That will add an entry into the panel on the left, on the right is where you configure that preset. I'd recommend doing the following:
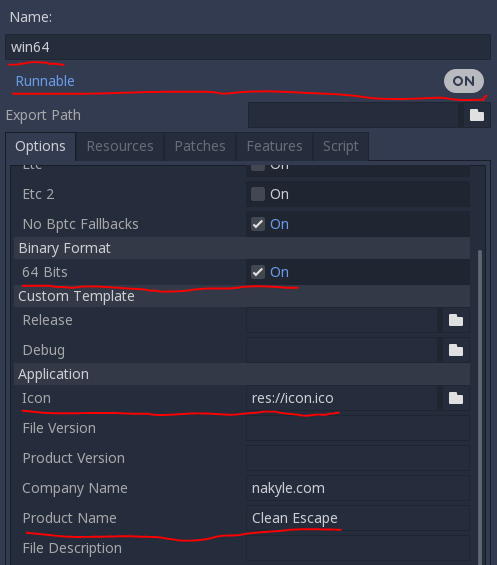
- Give a short descriptive name without spaces.
- Set runnable.
- Check 64 bits, or at least make a win32 and win64 preset.
- Provide an icon.
- Set a product name.
All of these things are little nice-to-haves and taking the small amount of time to set them up shows you care about producing a good product.
I also highly recommend producing a macOS and Linux build, again it is another small thing that sets you apart from the competition!
Once you've configured your presets that you'd like try selecting
them from the left, then clicking the Export Project
button down at the bottom. Choose where you want to put the files,
it's not very important at this stage, and then let 'er rip!
For a Windows build you should get a .pck file and an
.exe file. The executable is basically just a copy of
the standard Godot engine executable you use to work on your project!
The .pck file is all the packed and compressed resources
for your project, which can be changed in the export settings if you
find it is too large, but for most projects the defaults should be fine.
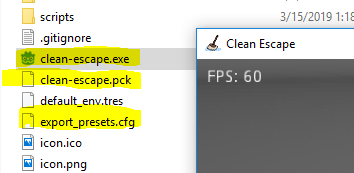
If you just added your first export preset you'll also notice a new
export_presets.cfg file, this is an important one!
For macOS exports you'll get a single .zip or
.dmg file, and Linux will give you a .pck
and a .x86_64 in a similar way to Windows, and in fact
the .pck file should be identical unless you changed
any compression settings in your Linux export preset.
At this point I would recommend you take copies of your exports and verify they work on the target platforms as much as possible! Godot is very good about just working but it's always a good idea to verify before we start doing this stuff automatically.
Barring any tweaks you may need to make for your project to work just right on all your desired export platforms we're now ready to start automating!
Version Control
At this stage it's probably also important to touch on an important
topic, version control.
To continue down this automation route you will need to have your
project checked into source control and have a repository hosted
on Bitbucket or Github.
I will be using CircleCI in my examples here, so either will work
fine, even with private repositories. If you have no idea what
git is, you'll need to
read
some
guides
and then come back here once you've got your project into a repository.
Otherwise, we should be all good, just make sure to check in that
export_presets.cfg file! Then we can choose our
CI (continuous integration) provider!
Choosing A CI Provider
There are a ton of continuous integration/build server offerings out there these days, but for this task I've gone with CircleCI. If you're unfamiliar with these kind of services I've got a rundown of my favorites below, feel free to skip if you A) already know this junk, or B) don't care!

Travis CI is pretty
close to an industry standard. It has out of the box support for
tons of languages and the common test/build tools they use.
There are a ton of guides and articles on using Travis CI, but I
feel that it's too limited with only Github support and it also
get's quite expensive for private repos after your 100 trial builds.

Semaphore is a much
smaller player than the others in this list but they built their
platform around parallel build steps so support for running frontend
and backend tests, build and deploy steps simultaneously is super
simple.
Semaphore is a favorite of mine for open source projects since it
supports Github and Bitbucket, has automatic detection of test
setup, and a simple interface. Similar to Travis, the private repo
support is prohibitively expensive without even really a trial
period.

CircleCI is
another widely used option. While it doesn't come with out of the
box support for as many languages as the other two, it has a very
competitive pricing model and excellent documentation.
CircleCI also has a very accommodating private repo policy with
1000 minutes of build time free every month. The interface is also
pretty straightforward though there is more legacy cruft than
Semaphore.
My preference is to use Semaphore for public repos and CircleCI for private. Both of these services beat out Travis' startup times, support multiple platforms, and have easily configured parallelization!
There are also many self-hosted solutions like Jenkins but I find that these options tend to become massive time-sinks that end up costing more in developer time than paying for a service. Another service I still need to try that seems very promising is GitLab CI but I don't have any experience with it yet!
Setting Up CircleCI
First follow the instructions
here
to setup/sign in to CircleCI and link it with your Github or
Bitbucket account.
Make sure you grant it access to private repos if your project is
private like mine!
Once you're signed into the application check up in the top left that you are performing actions for yourself, or the correct organization! It defaulted me over to one of the organizations I'm part of rather than just my personal account, so if you can't find your repo, just check that first.

Now, click the "Add Projects" button in the left hand
panel and look for your project in the list. Stay on the
"Linux" tab.
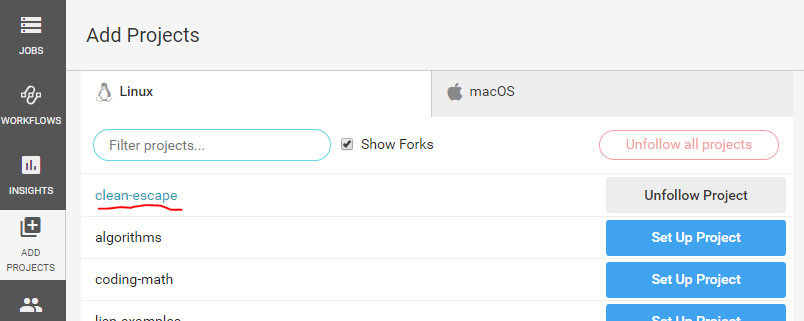
Then click the "Set Up Project" button on your project
and that should take you to this screen.
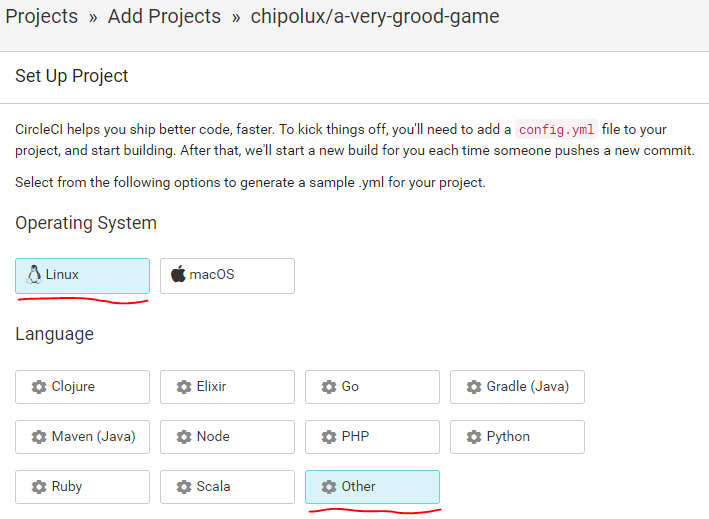
Here you want to select "Linux" as your operating system
and "Other" as the language since we will just be doing
custom steps the whole way through.
Next scroll down past the other parameters and settings until you
get to number 5, "Start building", you don't need to
worry about the rest since we'll walk through it all later. For now
just click that blue button and CircleCI will start watching your
repo!

When you click that guy, it should take you over to the Workflows or Jobs screen, and you'll see that your project failed to build! This is fine, we still haven't set up a build script so it's just failing because it doesn't know what to do.
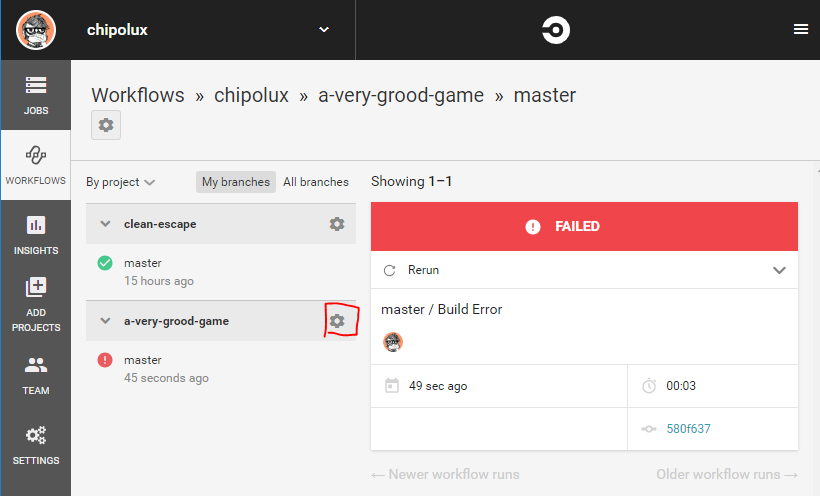
Before we give it detailed instructions we need to adjust a few settings, you may want to do different things here, but these are what I'd recommend to save you some free minutes each month! Click the little gear I circled in the image above to go to your project specific settings.
On that settings page go to "Advanced Settings" on the
left and then scroll down to the "Only build pull requests"
option and toggle it on. This will make CircleCI ignore all branches
unless they have an open pull request to your master/default branch.
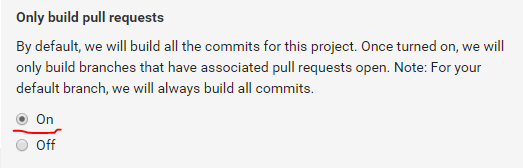
This is good so you don't waste time running automated builds for branches you may never deploy.
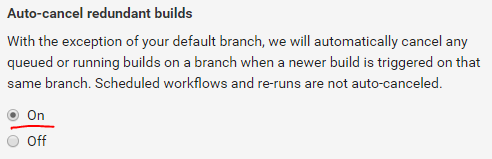
Next toggle on the "Auto-cancel redundant builds", this
option will cancel any running builds if a new commit is pushed up
that supersedes what's currently being built. This option may not
be what you want if you want to see builds pass for every commit but
for the case I'm setting up here I only want the most recent build
to complete and not waste precious minutes building exports that
will never go anywhere.
And that's all we need to do for now! CircleCI is now watching our
repo, will only build commits that will make it into the master/default
branch, and won't waste time building redundant exports.
We will come back here a little later to add some things on the
"Environment Variables" screen, but for now we need to
work on the build script.
Scripting Exports
Okay, this is one of the core pieces of our setup. The goal of this section will be to have CircleCI automatically fetch Godot, the export templates, put everything in place, and run our export presets to produce playable builds!
All of these actions are defined in this file.
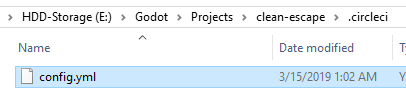
You'll want to create a ".circleci" folder in the root
of your project, so right next to your "project.godot"
file.
Inside that folder create a file called "config.yml".
And in that file add the following lines:
version: 2
jobs:
  build:
    machine:
      enabled: true
This first section tells CircleCI that we're going to define our
project using the version 2.0 structure and it also begins defining
the one job "build" that we want CircleCI to perform
every time we push up some code.
So far these are all the standard CircleCI 2.0 defaults, but the
final bit is special. By default CircleCI will use docker containers
to perform builds, but Godot crashes hardcore when trying to export
projects inside a container, so the "machine" bit tells
CircleCI to use a standard Linux VM, which is slightly slower to
start up, but is able to run the rest of our tasks flawlessly.
Next we need to add the following lines:
steps:
  - checkout
  - run:
      name: Install dependencies
      command: |
          sudo apt-get update
          sudo apt-get -y install wget zip unzip
"steps:" should be indented to exactly the same level
as the earlier "machine:" line and go right below the
"enabled: true" line.
The first line here just starts our list of "steps" that we want
CircleCI to perform. Each line that starts with a "-"
will be a new step.
The "- checkout" step is pretty simple, it just pulls
down the latest version of our code and from this point on all steps
will execute in the root folder of our project.
The next step is a complex "- run:" step. Run steps let
you execute arbitrary shell commands. There are lots of options on
how these run you can find in CircleCI's docs, but the defaults are
fine for our little tasks.
The "name: Install dependencies" line just tells CircleCI
to give this step a nice label in the UI when we go to review the
build, we will name all of our run steps.
Next the "command: |" line is just where we write
out the shell command(s) we want to run. The "|" at the
end of the line just let's CircleCI know that we are going to write
out our commands across multiple lines rather than all on one line.
Finally, the actual commands. This step just installs wget, zip, and unzip. Tools that are not on the machine by default but that we need to use to get Godot, and move files around.
Alright, now that I've got the build step format explained, we should be able to breeze through the next steps quickly!
- run:
    name: Download Godot 3.1
    command: |
        wget -q https://downloads.tuxfamily.org/godotengine/3.1/Godot_v3.1-stable_linux_headless.64.zip
        unzip Godot_v3.1-stable_linux_headless.64.zip
        mv Godot_v3.1-stable_linux_headless.64 godot
        chmod +x godot
This step just downloads and unzips the headless version of Godot, since our build machine doesn't have a display. It also renames the executable to a nice short name to make the next steps shorter and ensures that it is executable, just in case.
- run:
    name: Download Godot 3.1 Export Templates
    command: |
        wget -q https://downloads.tuxfamily.org/godotengine/3.1/Godot_v3.1-stable_export_templates.tpz
        mkdir -p ~/.local/share/godot/templates
        unzip Godot_v3.1-stable_export_templates.tpz -d ~/.local/share/godot/templates
        mv ~/.local/share/godot/templates/templates ~/.local/share/godot/templates/3.1.stable
This steps a bit more complex, first we download the Godot export
templates that match the version of Godot we got. Then, we need to
create the directory for the templates, which is
"~/.local/share/godot/templates" but could change in
future version I imagine since it is not documented anywhere I could
find. Then we unzip the templates, and rename the folder so it all
matches what Godot will be looking for.
All of this was just experimentally discovered by looking around on my Linux machine after installing the templates via the GUI. If you are using a different version of Godot you will want to experiment and see if these paths are correct, or ping me and I can check for you if you don't have easy access to a Linux environment!
- run:
    name: Export win64 build
    command: |
        mkdir -p win64
        ./godot --export win64 project.godot "win64/Clean Escape.exe"
And finally, the core of it all! These commandline arguments for
Godot aren't well documented, but the error messages helped me
figure it out. Basically this just creates a "win64"
directory, then runs our copy of Godot we just downloaded telling it
to export the "win64" export preset we defined earlier
and create the executable "win64/Clean Escape.exe"
(and of course it's matching "win64/Clean Escape.pck").
And bam, you're done! Well, kinda, you can add more steps to run any other export presets you want, just be sure to remember that Linux and Windows exports will behave the same with the executable and pck file pair, but macOS builds will produce a zip file, and other targets do even more different things or have other requirements.
Also, wait, no, this isn't done! What good does a few files on an ephemeral VM that is about to be destroyed do? We need to get them off of the build machine and out to the world, or out somewhere at least...
Automatic itch.io Releases
This is probably my favorite part! itch.io provides a tool called
"butler"
that can intelligently upload builds of your game to your store page.
If you don't like itch.io I'm sure other services have API's and
other automated tools to upload releases, or you could even add SSH
keys via CircleCI's admin interface and have your script just
"scp" files off to whatever server or system you want.
But anyway, in this section I'll go over how to setup butler, securely add access keys into your CircleCI build process, and perform the uploads selectively with a commit flag! I'd also recommend reading through the docs on butler that I linked above, as it has more features than I will show here and you might notice something awesome I missed!
First, we need to setup an itch.io API key and include it in our
CircleCI environment. To generate an API key, go
here and click
the "Generate new API key" button.
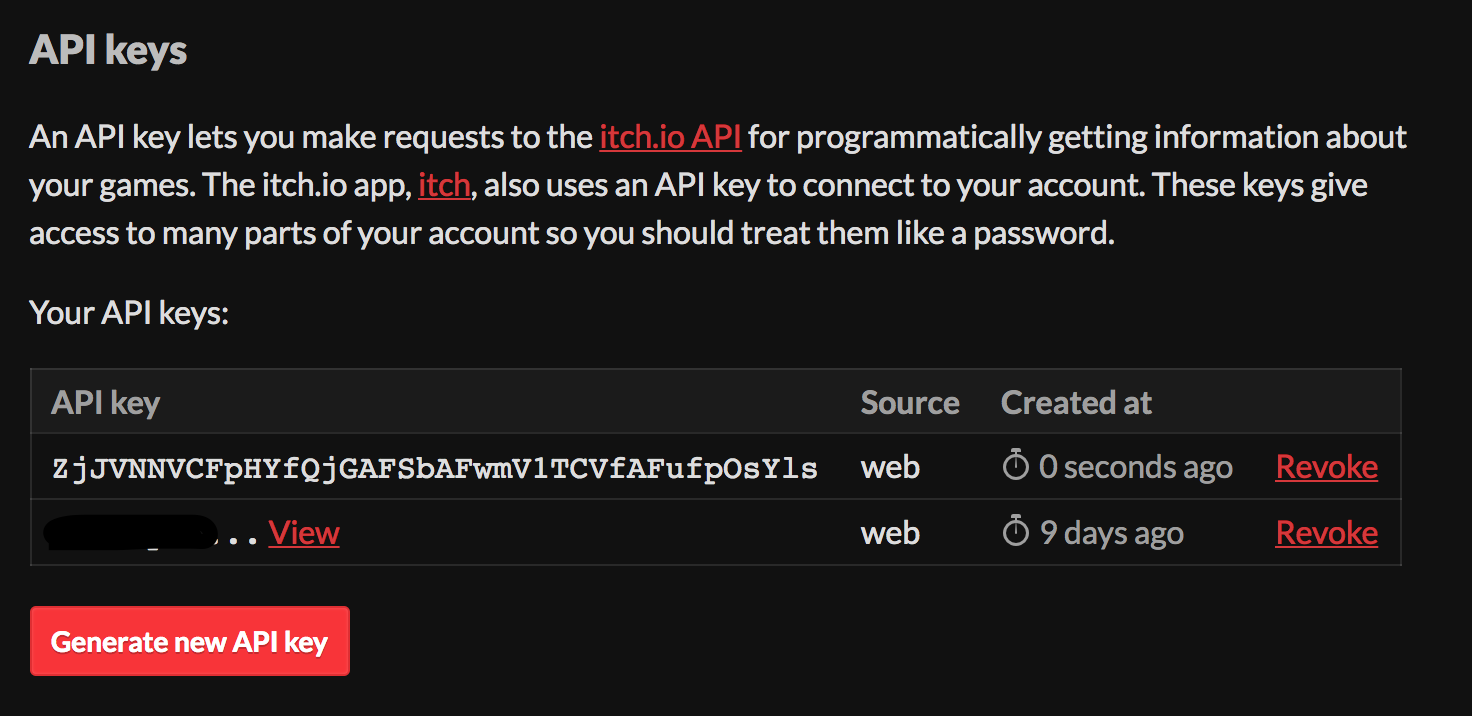
Then click the little "View" next to the new entry and
copy that long code, we're going to add this code to our CircleCI
project. Just be sure you never share this code with anyone! And
if you ever accidentally let people see it, make sure you go back
to this page and click that "Revoke" button, otherwise
anyone who has that key basically has access to your entire account!
Next you'll want to go back to your CircleCI project settings page
and go to the "Environment Variables" screen.
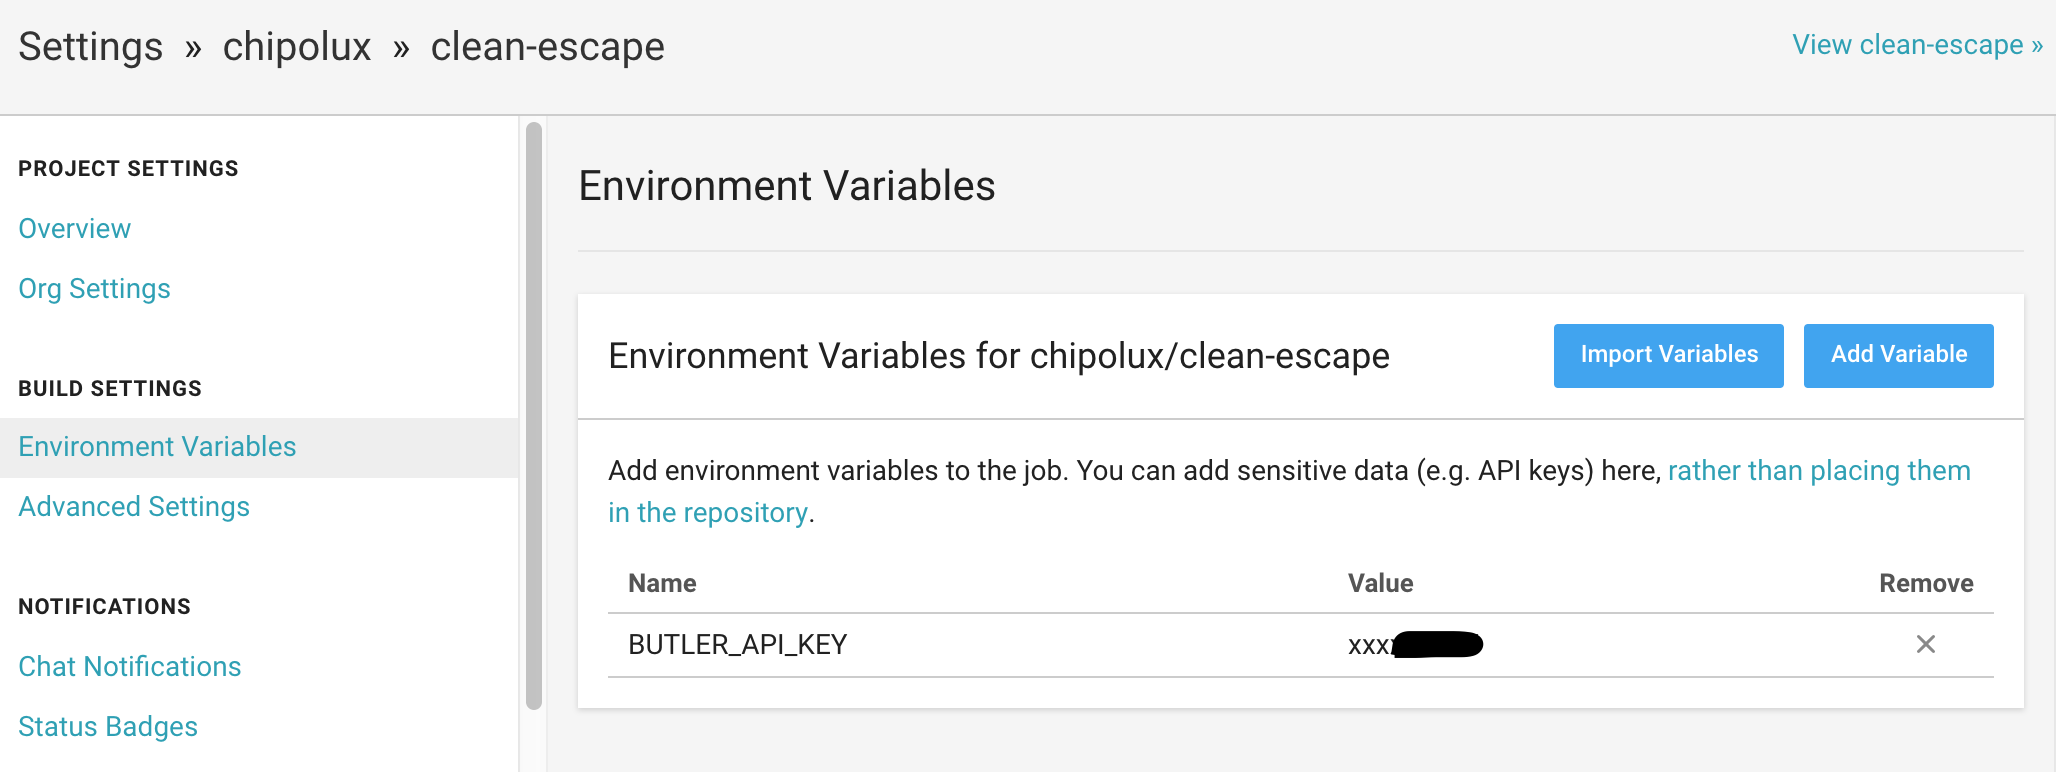
Then click the "Add Variable" button, and set the name
to "BUTLER_API_KEY" and the value should be the API
key you copied from the itch.io settings page.
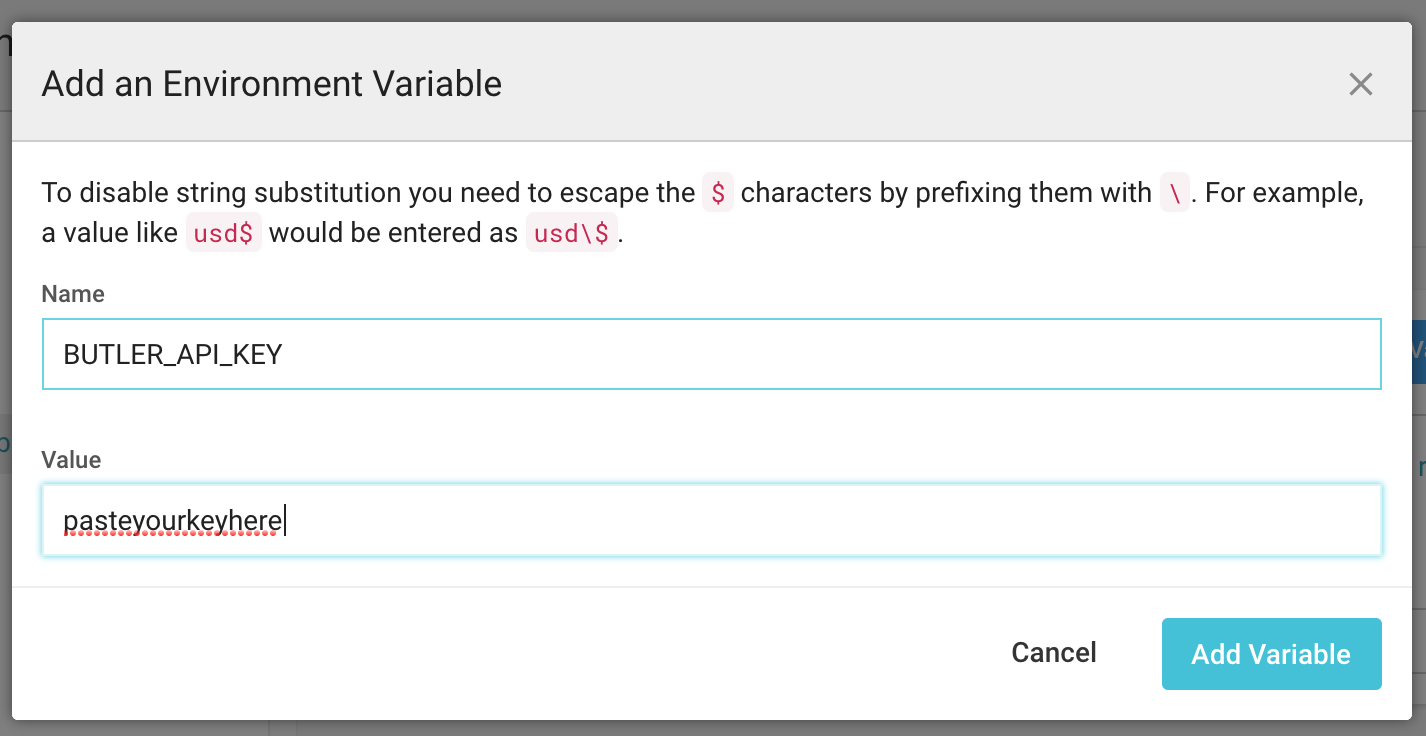
Then click "Add Variable" to close out that dialog and
then we're done here. Now butler will see that environment variable
and be able to upload releases for you!
Next, we need to update our CircleCI script to add some steps. This first one will download butler and get it ready for us to use.
- run:
    name: Download butler
    command: |
        wget -q -O butler.zip https://broth.itch.ovh/butler/linux-amd64/LATEST/archive/default
        unzip butler.zip
        chmod +x butler
Add this step in just after the "Download Godot 3.1 Export Templates" step, and it will download the latest version of butler from itch.io's sources, and get it ready for use.
Then, you can add steps like this one after each export step.
- run:
    name: Upload win64 build
    command: if [[ $(git log -1 --oneline) == *"[RELEASE]"* ]]; then ./butler push win64 chipolux/clean-escape:win-64bit; fi
In laymens terms, this step checks to see if the commit we are building
contains [RELEASE] and if it does it uploads the build
to the Clean Escape itch.io page.
One half of this command is using a standard bash if statement to check if the latest commit message contains our marker.
if [[ $(git log -1 --oneline) == *"[RELEASE]"* ]]; then ...stuff...; fiYou can change what the marker is by changing the text inside those double quotes. The upload command (replaced here with ...stuff...) is only executed if that marker text is found.
Here's the upload command, it's composed of 4 parts:
./butler push win64 chipolux/clean-escape:win-64bit"
push" tells butler we want to upload a new release,
"win64" is the name of the folder that we want to upload
(a file is acceptable too), "chipolux/clean-escape"
is the project we want to upload the release for, and
"win-64bit" is the "channel".
Channels are basically just any string you want, and any uploads to the same channel will replace each other and including mac, win, linux, or android will mark the upload for that platform.
And that's it! Now if you push up a commit to the master/default
branch of your repo and include [RELEASE] (or whatever
you want to change it to) then CircleCI will kick off a build and
if the build succeeds it will upload that release to itch.io!
Summary
So, after all that you should have a pretty good understanding of CircleCI, Godot exports, and automatic itch.io releases.
If you didn't want to read all the details here are the core steps:
- Setup export presets for your project in Godot, ideally with short names and no spaces.
- Test those export presets locally to make sure everything works right.
- Get your project version controlled with git and host a repo on Github or Bitbucket.
- Signup for an itch.io account and setup a new page for your game.
- Signup for CircleCI account and get it to start building your repo on Linux
- Setup a CircleCI config.yml that downloads Godot and the export templates and builds your project.
- Generate an itch.io API key and add it to your CircleCI environment variables.
- Add some steps to our CirlceCI config to download butler and perform the uploads when you commit with a special marker.
And here is the full copy of my CircleCI config for your reference:
version: 2
jobs:
  build:
    machine:
        enabled: true
    steps:
      - checkout
      - run:
          name: Install dependencies
          command: |
              sudo apt-get update
              sudo apt-get -y install wget zip unzip
      - run:
          name: Download Godot 3.1
          command: |
              wget -q https://downloads.tuxfamily.org/godotengine/3.1/Godot_v3.1-stable_linux_headless.64.zip
              unzip Godot_v3.1-stable_linux_headless.64.zip
              mv Godot_v3.1-stable_linux_headless.64 godot
              chmod +x godot
      - run:
          name: Download Godot 3.1 Export Templates
          command: |
              wget -q https://downloads.tuxfamily.org/godotengine/3.1/Godot_v3.1-stable_export_templates.tpz
              mkdir -p ~/.local/share/godot/templates
              unzip Godot_v3.1-stable_export_templates.tpz -d ~/.local/share/godot/templates
              mv ~/.local/share/godot/templates/templates ~/.local/share/godot/templates/3.1.stable
      - run:
          name: Download butler
          command: |
              wget -q -O butler.zip https://broth.itch.ovh/butler/linux-amd64/LATEST/archive/default
              unzip butler.zip
              chmod +x butler
      - run:
          name: Export win64 build
          command: |
              mkdir -p win64
              ./godot --export win64 project.godot "win64/Clean Escape.exe"
      - run:
          name: Upload win64 build
          command: if [[ $(git log -1 --oneline) == *"[RELEASE]"* ]]; then ./butler push win64 chipolux/clean-escape:win-64bit; fi
      - run:
          name: Export linux64 build
          command: |
              mkdir -p linux64
              ./godot --export linux project.godot "linux64/clean-escape"
      - run:
          name: Upload linux64 build
          command: if [[ $(git log -1 --oneline) == *"[RELEASE]"* ]]; then ./butler push linux64 chipolux/clean-escape:linux-64bit; fi

      - run:
          name: Export mac build
          command: |
              ./godot --export macOS project.godot "clean-escape-mac"
              mv clean-escape-mac clean-escape-mac.zip
      - run:
          name: Upload mac build
          command: if [[ $(git log -1 --oneline) == *"[RELEASE]"* ]]; then ./butler push clean-escape-mac.zip chipolux/clean-escape:mac; fi
Hopefully this all made sense and I didn't miss anything important!
If you have any comments or suggestions hit me up on
freenode, I usually lurk in the
#godotengine channel as chipolux or email
me: nakyle at nakyle dotcom, or there is
always twitter of course.